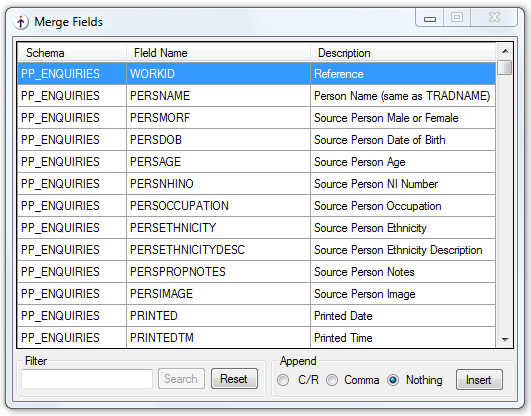
When you create or edit a template fragment, the Template Maintenance Tool opens the fragment in Microsoft Word and displays a Merge Fields dialog. The dialog lists the database fields that are made available by the fragment's associated schemas. Word uses its usual Normal template (Normal.dotm).
For each field, the Merge Fields dialog shows the relevant schema, field name and field description.

Caution
If you close the dialog, there is no way to reopen it; you must close Word and then reopen the fragment from the Template Maintenance Tool.
Inserting merge fields from the Merge Fields dialog
To insert a merge field:
-
In Word, position your cursor at the point where you want to insert the field.
-
In the Merge Fields dialog, in the Filter field, type all or part of the wanted field's description and then click Search.
The list of merge fields is filtered to match your search criteria.
-
Click the required field.
Use Shift+Click or Ctrl+Click to select multiple fields.
-
Optionally, select C/R (carriage return), Comma or Nothing to specify what follows the field (this is useful if you are inserting several fields one after another).
-
Click Insert.
The field appears in the Word document as …
«FIELD_NAME»
… but the underlying field code is either …
{MERGEFIELD FIELD_NAME \@ CHARFORMAT}
… if the field is from the main schema, or …
{MERGEFIELD CHILD_SCHEMA_NAME:FIELD_NAME \@ CHARFORMAT}
… if the field is from a child schema.
Although a merge field longer than 40 characters may appear truncated when inserted in Word, the underlying field code always shows the full field name.
Also, if the inserted field is from a child schema it is automatically enclosed in «TS» and «TE» fields (unless they are already present) for which the underlying field codes are {MERGEFIELD TableStart:CHILD_SCHEMA_NAME} and {MERGEFIELD TableEnd:CHILD_SCHEMA_NAME}.
Changing the format of a merge field
To reveal the code of a field inserted from the Merge Fields dialog, select the field in Word and then press Shift+F9. (Press Alt+F9 to reveal all fields at once.)
For example, for an inserted date field, you might see something like:
{MERGEFIELD BIRTHDATE \@ CHARFORMAT}
When a document is produced that includes this fragment, the date appears in a default format that may not be what you intended.
You can define a format by replacing CHARFORMAT with Word's own field codes, also known as "pictures".
For example, if you edited the field code to be:
{MERGEFIELD BIRTHDATE \@ "dddd, d MMMM yyyy"}
this could produce:
Wednesday, 2 September 2015
The following table shows the most popular date pictures available in Word.
|
Date element |
Picture |
Example output based on: |
|---|---|---|
|
Day |
d |
2 |
|
dd |
02 |
|
|
ddd |
Wed |
|
|
dddd |
Wednesday |
|
|
Month |
MM |
09 |
|
MMM |
Sep |
|
|
MMMM |
September |
|
|
Year |
yy |
15 |
|
yyyy |
2015 |
Similarly, by default, currency values are just numbers. To format them, you could simply prefix the inserted field with the appropriate currency symbol; for example:
£«PAYMENT»
Alternatively, you could edit the field code to something like:
{MERGEFIELD PAYMENT \# "£#,##0.00"}
which might produce, for example:
£1,095.50